Chemistry formulae
This article highlights two LaTeX packages designed for typesetting chemical content and documentation:
- chemfig: a package to draw structural formulae of molecules
- mhchem: a package to typeset chemical formulae and equations
Using chemfig to draw molecules (structural formulae)
Drawing a molecule consists mainly of connecting groups of atoms with lines. Simple linear formulae can be easily drawn using the chemfig package, as shown in the following example:
\documentclass{article}
\usepackage{chemfig}
\begin{document}

\section{Introduction}
Writing chemical formulae with chemfig is straightforward.

\chemfig{A=B}
\end{document}
Open this chemfig example in Overleaf
The following image shows the output produced by the example above:

The package is imported by \usepackage{chemfig} in the preamble. The command \chemfig{A=B} the draws the molecule. The symbol = determines the type of bond. See the reference guide for a list of bond types.
Angles
There are several ways to define angles between bonds in molecules.
To define chemical formulae you can use units that define the angles

\chemfig{A-[1]B-[7]C}

Absolute angles

\chemfig{A-[:50]B-[:-25]C}

Relative angles

\chemfig{A-[::50]B-[::-25]C}
Open this chemfig example in Overleaf
The following image shows the output produced by the example above:
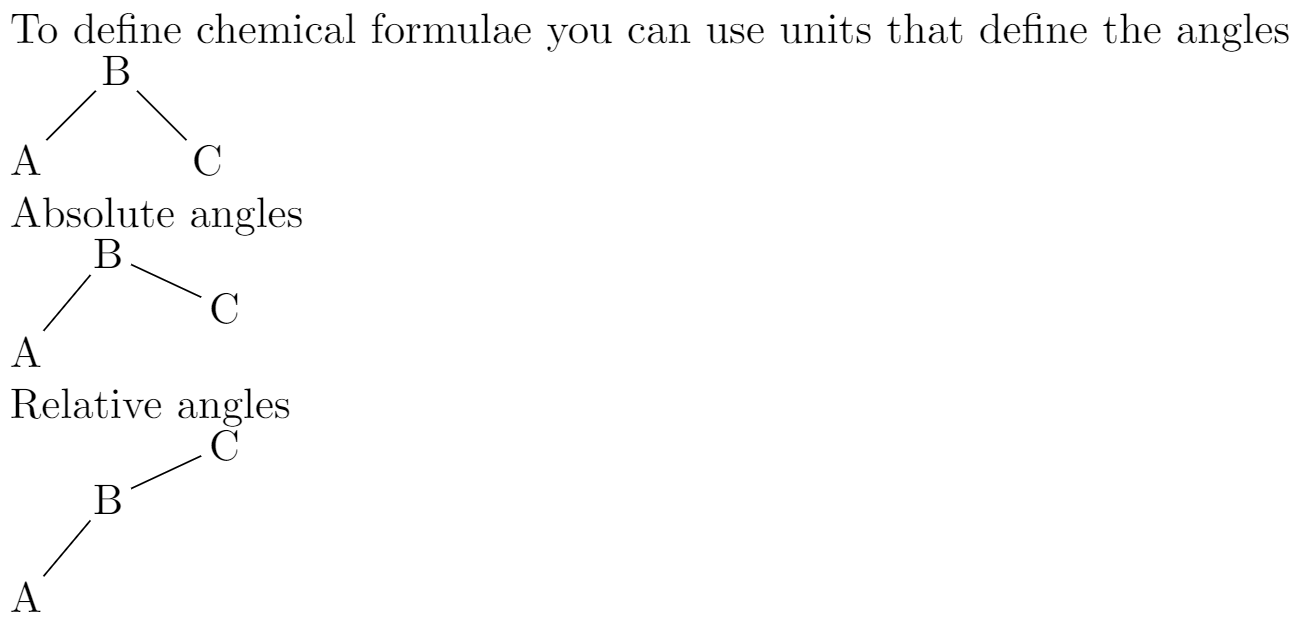
Each one of the three commands in the example above uses a different method to determine the angle between bonds.
default units: In the command\chemfig{A-[1]B-[7]C}the parameters inside brackets set the angle in special units, each unit equals 45°. Hence in the example the angles are 45° and 315°.absolute units: The angles can be set in absolute units, in the command\chemfig{A-[:50]B-[:-25]C}the parameter inside the brackets represent the angle, in degrees, measured from the horizontal baseline. Negative angles are allowed.relative angles: In the third example\chemfig{A-[::50]B-[::-25]C}the angles are measured from the previous bond, instead of the baseline.
Rings
The example below presents the syntax to draw regular polygons:
Regular polygons:

\chemfig{A*5(-B=C-D-E=)}

Incomplete rings are also possible:

\chemfig{A*5(-B=C-D)}
Open this chemfig example in Overleaf
The following image shows the output produced by the example above:

The syntax of the command \chemfig{A*5(-B=C-D-E=)} is explained below:
A: This is the first atom, the rest of the atoms will be drawn from here*5: Number of sides of the polygon(-B=C-D-E=): The rest of the atoms and bonds. If not enough are passed to complete the polygon, an incomplete ring will be drawn.
There is an additional parameter that can be passed to this command: a double asterisk. For instance, if **5 is set instead of *5 a circle is drawn inside the polygon.
Connected rings
The next example draws the chemical structure of caffeine:
\documentclass{article}
\usepackage{chemfig}
\begin{document}
\section{I need caffeine.}

\chemfig{*6((=O)-N(-)-(*5(-N=-N(-)-))=-(=O)-N(-)-)}
\end{document}
Open this chemfig example in Overleaf
The following graphic shows the output produced by the caffeine example:

Branches
Chemical formulae are not always linear, branched formulae are actually the most common type. Below an example on how to create them.
Branched molecule \vspace{.5cm}

\chemfig{H-C(-[2]H)(-[6]H)-C(=[1]O)-[7]H}
Open this chemfig example in Overleaf
The following image shows the output produced by the example above:
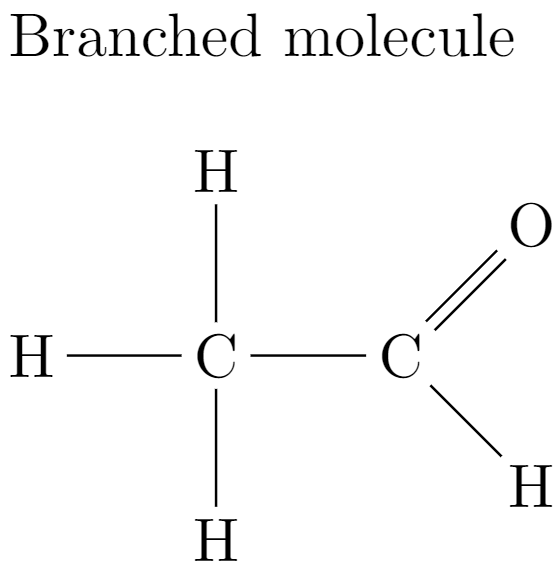
Branches in each node are created by adding formulas inside parentheses. For instance, the code
C(-[2]H)(-[6]H)
creates two branches in "C", one with a 2 units angle (90°) and other with a 6 units angle (270°).
Branches can also be added to rings:
Branched ring
\vspace{.5cm}

\chemfig{A*6(-B=C(-CH_3)-D-E-F(=G)=)}
Open this chemfig example in Overleaf
The following image shows the output produced by the example above:
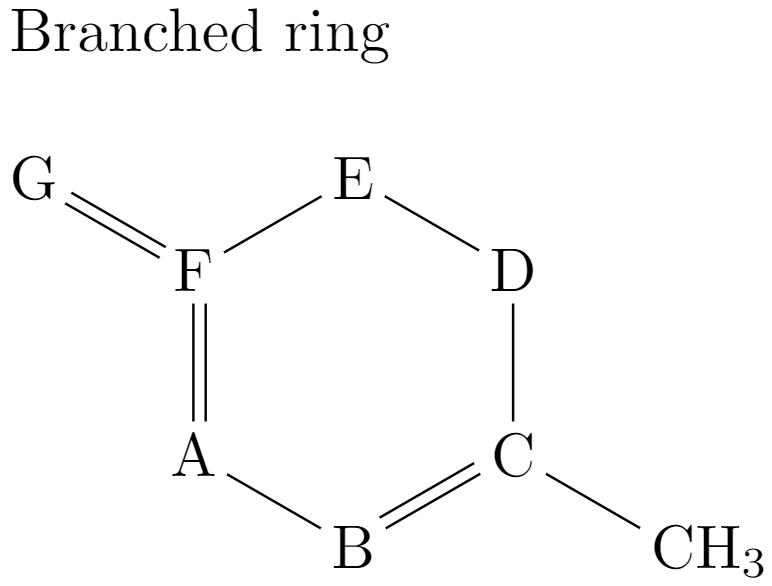
The syntax is similar, using parentheses a branch can be attached to a node (atom). For instance
F(=G)
attaches a branch to the node "F". More complex examples can be created using nested branches and even attaching rings as branches.
Customizing the formulae
Several parameters such as colors and the node separation can be changed, also additional text to describe the formula can be added.
{\huge
    \setchemfig{atom sep=2em,bond style={line width=1pt,red,dash pattern=on 2pt off 2pt}}
    \chemname
    {\chemfig{H-C(-[2]H)(-[6]H)-C(=[1]O)-[7]H}}
    {Acetaldehyde}
}
Open this chemfig example in Overleaf
The following image shows the output produced by the example above:

There are two new commands here:
\setchemfig{}: This command is used to configure settings for drawing chemical structures.
\chemname{}{}: The first parameter in this command is achemfigformula, the second one is some text that will be printed below the formula. In the example, the text is "Acetaldehyde".
Notice also that the font used is huge. You can use any other font size and the formula will be scaled accordingly.
Reference guide (chemfig)
Bond types
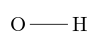
| Bond type | code | output |
|---|---|---|
| single | \chemfig{O - H}
|
|
| double | \chemfig{O = H}
|

|
| triple | \chemfig{O ~ H}
|

|
| plain right cram | \chemfig{O > H}
|

|
| plain left cram | \chemfig{O < H}
|

|
| dashed right cram | \chemfig{O >: H}
|

|
| dashed left cram | \chemfig{O <: H}
|

|
| hollow right cram | \chemfig{O >| H}
|

|
| hollow left cram | \chemfig{O <| H}
|

|
Using mhchem to typeset chemical formulae and equations
The mhchem package’s versatile \ce command, which is supported by Overleaf’s Visual Editor preview, enables typesetting of chemical formulae and equations; for example, writing \ce{H2O} typesets \(\text{H}_2\text{O}\), the chemical formula for water.
- Note: Recent versions of the
mhchempackage can increase the time needed for your project to compile. Switching to thechemformulapackage, and using its\chcommand, can decrease compilation time but the\chcommand is not currently previewed by Visual Editor.
How to load the mhchem package
To use the latest version of mhchem, currently version 4, add the following line to your document preamble:
\usepackage[version=4]{mhchem}
This loads mhchem with its default styles for formatting chemical formulae and equations. To change those defaults you can either use mhchem package options or the \mhchemoptions command. For example, to change the text mode font to sans serif and draw arrows using PGF/TikZ, you can load mhchem using
\usepackage[version=4,arrows=pgf-filled,textfontname=sffamily]{mhchem}
or you can use the \mhchemoptions command within your document
\mhchemoptions{arrows=pgf-filled,textfontname=sffamily}
The mhchem package documentation provides further guidance on configuring mhchem, together with numerous examples of chemical formulae and equations, a few of which we reproduce here to help you get started. Note the use of space characters within more complex input to the \ce command. Those spaces are required to help mhchem correctly parse your chemical formulae and equations; omitting them can trigger the error Unexpected input character.
Some examples
The following Overleaf project loads mhchem using three package options:
arrows=pgf-filled: draws filled arrows using PGFtextfontname=sffamily: outside of math mode, chemical formulae and equations are typeset using using the default sans serif fontmathfontname=mathsf: in math mode use a sans serif font
The \ce command is used to typeset a range of examples.
\documentclass{article}
%Load mhchem using some package options
\usepackage[version=4,arrows=pgf-filled,
textfontname=sffamily,
mathfontname=mathsf]{mhchem}
\begin{document}
\subsection*{Simple molecules}

\begin{itemize}
\item Water: \verb|\ce{H2O}|, \ce{H2O}
\item Benzene: \verb|\ce{C6H6}|, \ce{C6H6}
\item Hydrogen peroxide: \verb|\ce{H2O2}|, \ce{H2O2}
\item Acetic acid: \verb|\ce{C2H4O2}|, \ce{C2H4O2}
\item Glucose: \verb|\ce{C6H12O6}|, \ce{C6H12O6}
\end{itemize}

\subsection*{Chemical equations}

Two basic examples:

\begin{itemize}
\item \verb|\ce{2H2 + O2 -> 2H2O}| typesets \ce{2H2 + O2 -> 2H2O}
\item \verb|\ce{CO2 + C -> 2 CO}| typesets \ce{CO2 + C -> 2 CO}
\end{itemize}

\subsection*{A more complex example}

Writing \verb|\ce{Hg^2+ ->[I-] HgI2 ->[I-] [Hg^{II}I4]^2-}| typesets this:\vskip10pt
\noindent \ce{Hg^2+ ->[I-] HgI2 ->[I-] [Hg^{II}I4]^2-}.

\subsection*{A math mode example}

Chemical expressions can be typeset using math mode commands such as \verb|\frac|. \vskip10pt

\noindent Writing \verb|\[K=\frac{[\ce{Hg^2+}][\ce{Hg}]}{[\ce{Hg2^2+}]}\]| produces this:

\[K=\frac{[\ce{Hg^2+}][\ce{Hg}]}{[\ce{Hg2^2+}]}\]
\end{document}
Open this mhchem example in Overleaf.
This project produces the following output:

The mhchem package documentation is well worth reading because it contains numerous examples of chemical formulae and equations in addition to information on package options and configuration.
Visual Editor’s preview of chemical formulae and equations
Overleaf’s Visual Editor provides a preview of chemical formulae and equations typeset by the \ce command, as demonstrated in the following video clip:
The “Unexpected input character” mhchem error
The mhchem package error Assertion failed: Unexpected input character often results from missing spaces in the \ce command input—spaces are essential for mhchem to accurately parse the more complex chemical expressions. This error can arise when copying and pasting examples from PDF documents, where spaces may not be accurately replicated.
The following example demonstrates this error:
\ce{CO2+C->2CO}
Open this error-generating mhchem example in Overleaf.
As a minimum, we need to put a space between the C and the -> ; however, that approach might still not be sufficient to typeset our desired expression. With all spaces added correctly, it looks like this:
\ce{CO2 + C -> 2 CO}
Open this corrected mhchem example in Overleaf.
This project produces the following output:

Further reading
For more information see