How to insert figures in Overleaf
Overleaf provides 3 ways to create LaTeX figures:
- Use the Insert Figure button (
 ) to insert a figure into Visual Editor or Code Editor.
 - Copy and paste an image into Visual Editor or Code Editor.
- Use Code Editor to write LaTeX code that inserts a graphic and places it inside a figure environment.
Options 1 and 2 automatically generate the LaTeX code required to create your figure, but if you’re a confident LaTeX user you might prefer option 3 which provides the most flexibility. If you’re new to LaTeX then option 1, the Insert Figure button (the focus of this page), is a great way to get started.
Before using any of these figure-creation methods, make sure your main LaTeX file has loaded the graphicx package by writing \usepackage{graphicx} within its preamble.
Using Visual Editor and Code Editor
Before we explain how to insert a figure, it’s worth noting Visual Editor’s figure preview feature.
Figures can be inserted into Visual Editor or Code Editor, but only Visual Editor provides a preview of the figure together with a button which opens a modal window allowing you to make changes. The following brief video clip demonstrates Visual Editor’s figure preview feature.
Using Insert Figure to add a figure to your project
Use the following steps to insert a figure into an Overleaf LaTeX document.
- Choose which editor you want to use: Visual Editor or Code Editor.
- Select the Insert Figure button () to display a list of options for inserting figures:
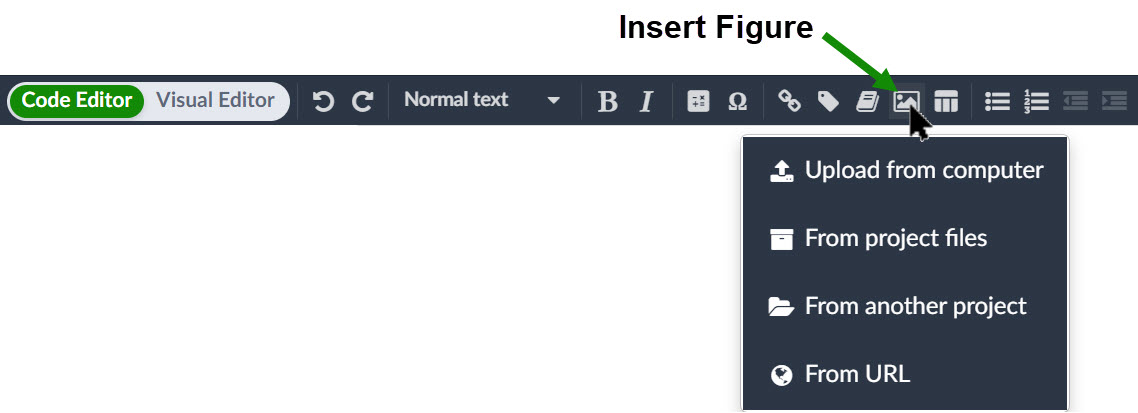
- Use the following document links to jump to the option of interest:
Upload from computer
This option creates a figure using a graphics file uploaded from your device.
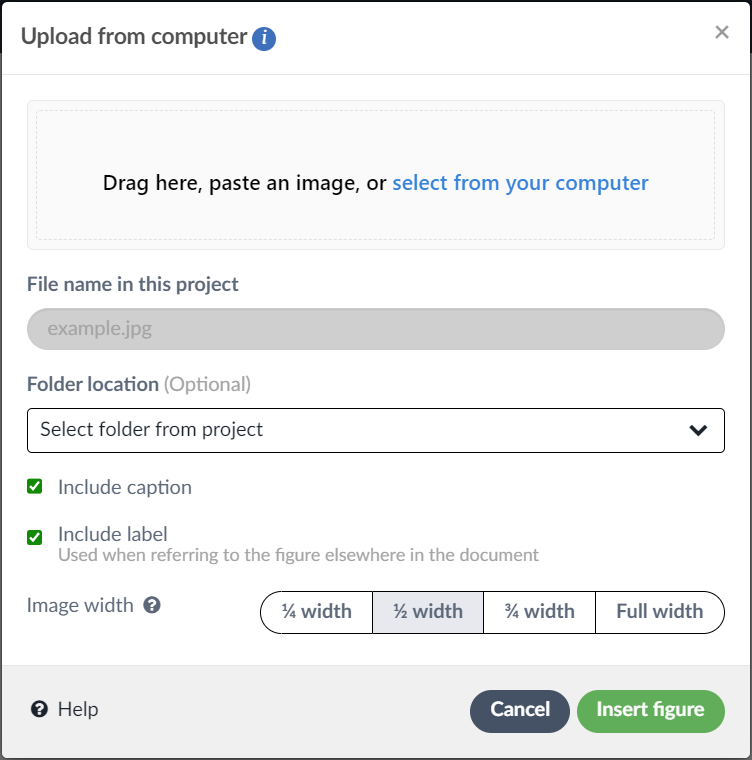
To use this option:
- Upload a graphic using one of these methods:
- drag and drop a graphics file onto the modal window (within the area shown)
- paste an image into the modal window (within the area shown)
- manually select a file located on your device
- Give the graphics file a name.
- (Optional) Choose a project folder in which to save the file.
- Decide whether to use a figure caption.
- Decide whether to include a label (used for referencing the figure).
- Set the image width (as a fraction of
\linewidth). - Select Insert figure to upload the graphic and automatically generate a LaTeX
figureenvironment based on your choices.
From project files
This option creates a figure using one of the graphics files previously uploaded to your current project.
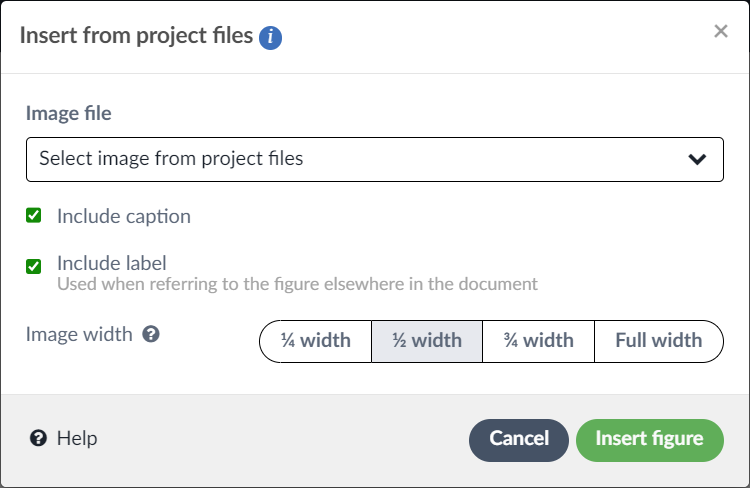
To use this option:
- Choose a graphic contained in your project.
- Decide whether to use a figure caption.
- Decide whether to include a label (used for referencing the figure).
- Set the image width (as a fraction of
\linewidth). - Select Insert figure to automatically generate a LaTeX
figureenvironment based on your choices.
From another project
This option creates lets you create figures using graphics files contained in another one of your Overleaf projects. As shown in the animated sceenshot below, you select a project then choose a file previously uploaded to that project, or a file output (generated) by that project—for example, a PDF graphic generated by externalizing TikZ graphics. See the section Select from output files for a video clip showing how to use an output file created by another project.

To use this option:
- Choose a project containing graphics files you’d like to use in your current project.
- Select one of that project’s graphics:
- an image file uploaded to that project, or
- an output file generated by that project.
- Give the graphics file a name.
- (Optional) Choose a project folder in which to save the file.
- Decide whether to use a figure caption.
- Decide whether to include a label (used for referencing the figure).
- Set the image width (as a fraction of
\linewidth). - Select Insert figure to automatically generate a LaTeX
figureenvironment based on your choices.
Select from output files
The video clip below walks you through the process of incorporating a figure into your current project, utilizing a file generated from another project that creates externalized TikZ graphics.
From URL
This option lets you create figures using graphics added (downloaded) to your project via a URL.
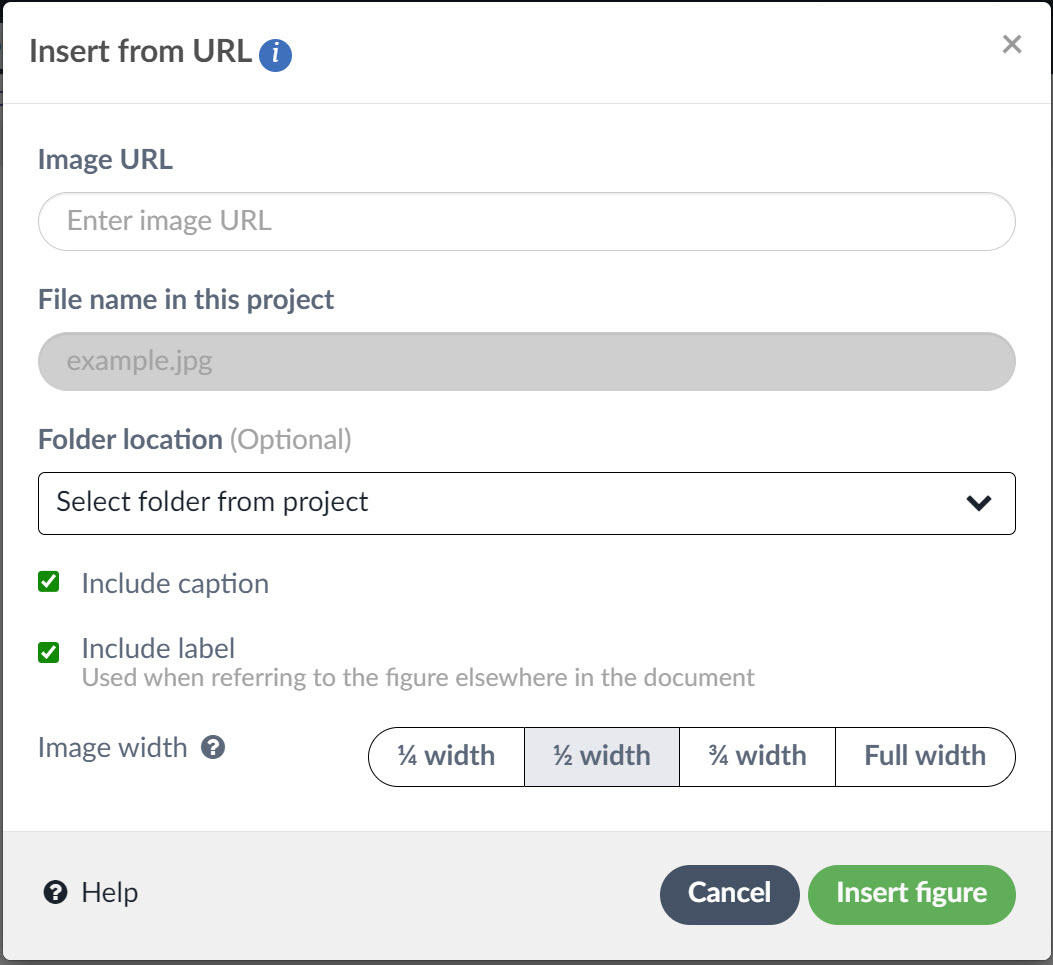
To use this option:
- Paste a direct download link (URL) into the Image URL field.
- Give the graphics file a name.
- (Optional) Choose a project folder in which to save it.
- Decide whether to include a figure caption.
- Decide whether to include a label (used for referencing the figure).
- Set the image width (as a fraction of
\linewidth). - Select Insert figure to automatically generate a LaTeX
figureenvironment based on your choices.
The following video clip demonstrates using a Google Drive download URL. It also shows how to change the figure size and give it a caption.